AI Amazon Repricer
Boost your Amazon profits and avoid price wars with AI repricing
Many online sellers and business owners find the Amazon marketplace appealing due to its extensive selection of seller tools, applications, and solutions.

Many online sellers and business owners find the Amazon marketplace appealing due to its extensive selection of seller tools, applications, and solutions. The abundance of options and resources available when starting an Amazon store is among the factors that draw online sellers into the Amazon marketplace.
In particular, online entrepreneurs and brand owners are drawn to Amazon because of the Amazon Storefront. This seller tool allows brand owners to display their product listings and enhance their operations effectively.
In this article, we delve into the steps of creating an Amazon Storefront and some insights and practical tips to help you maximize your Amazon Store and streamline your journey to eCommerce success.
Before addressing the question “how to create an Amazon storefront,” it is essential to distinguish first the term “Amazon store” from “Amazon Storefront,” as online sellers and business owners frequently encounter both terms.
“Amazon store” is a general term that refers to the entire Amazon website where third-party merchants sell individual products; it is where third-party sellers compete for listing visibility. Sellers list their products independently within this Amazon marketplace, and the fees vary depending on their selling plan.
Individual Sellers pay $0.99 per item sold, while Professional Sellers are subject to a monthly subscription fee of $39.99, alongside other Amazon selling fees.
In contrast, Amazon Storefront, sometimes referred to simply as “Store” or “Amazon Store (uppercase S),” denotes a dedicated space within Amazon specifically tailored for a brand. While customization options are limited within the standard Amazon store, Amazon Storefront provides enhanced flexibility.
Brand registered sellers can customize elements such as brand logos, banners, product categories, and layout to create a unique brand experience. With Amazon Store, it is as if sellers have their own custom-branded website on Amazon that effectively highlights various product listings and best selling products.
Regarding fees, in addition to the Professional seller account fee of $39.99 per month, sellers opting for Amazon Storefront incur additional monthly fees depending on the chosen plan. As an overview of the differences between Amazon Store and Amazon Storefront, you can check the table below:
| Amazon store (lowercase s) | Amazon Storefront (uppercase S) | |
| Description | Selling individual products on Amazon | Dedicated brand space on Amazon |
| Customization | Limited | More options for branding and presentation |
| Fees | Lower | Higher with additional monthly fees |
| Pros | Easy setup, large audience | Brand awareness, unique shopping experience, analytics |
| Cons | High competition, limited branding, marketing tools | Higher fees, requires more effort |
In essence, the Amazon store offers a fundamental approach for sellers to individually list and sell products on the Amazon platform, serving as an entry point for beginners and those with smaller budgets. Conversely, Amazon Storefront presents a more sophisticated solution, granting third-party sellers and brand owners a specialized, branded space within Amazon.
Deciding between an Amazon Store and Storefront relies on several considerations. Beyond meeting Storefront eligibility requirements, factors such as your business’s scale and financial resources play crucial roles.
Sellers who are new to the Amazon marketplace and have a limited budget may find the Amazon Store an ideal entry point. Conversely, seasoned Amazon sellers equipped with a well-established brand identity and ample financial backing may find the Amazon Storefront a compelling avenue.
If you are a brand owner and wish to improve the overall performance of your brand in the Amazon marketplace, having a Storefront is highly beneficial for your business. You can use the section below as your guide on how to build an Amazon Storefront for your brand.
STEP 1: Begin by signing into your Amazon Seller Central account. Navigate to the “Menu” tab, look for “Stores,” and then click the “Manage Stores” tab. As an alternative starting point, you can also log into your Amazon Ads account.
Image Source: Seller Central – “Dashboard Menus,” Screenshot taken Feb. 14, 2024.
STEP 2: Once redirected, click the “Create Store” button and choose your brand.
Image Source: Amazon Store – “Create Store,” Screenshot taken Feb. 14, 2024.
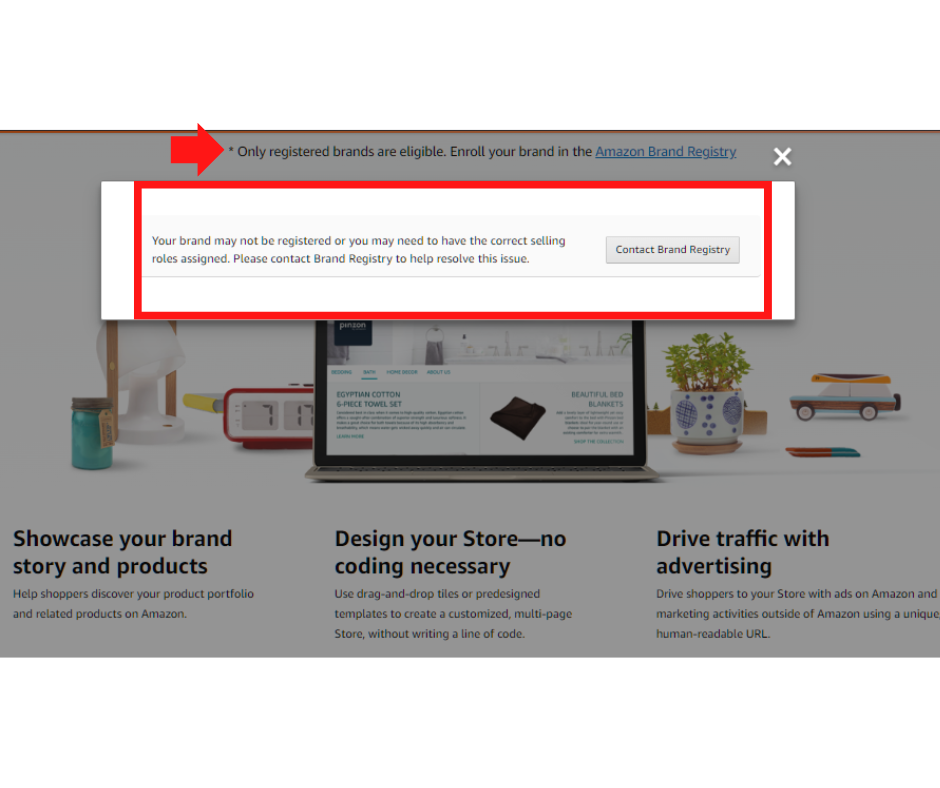
However, your brand will only appear if enrolled in the Brand Registry. Amazon Brand Registry is an Amazon program that helps sellers and brand owners protect their brands. Once your brand has been registered, you can access Amazon Stores Builder and other brand management tools.
If your brand is not enrolled, a message prompt will appear, as seen below. To register your brand, click the “Amazon Brand Registry” link at the top of the message prompt.
Image Source: Amazon Store – “Create Store,” Screenshot taken Feb. 14, 2024.
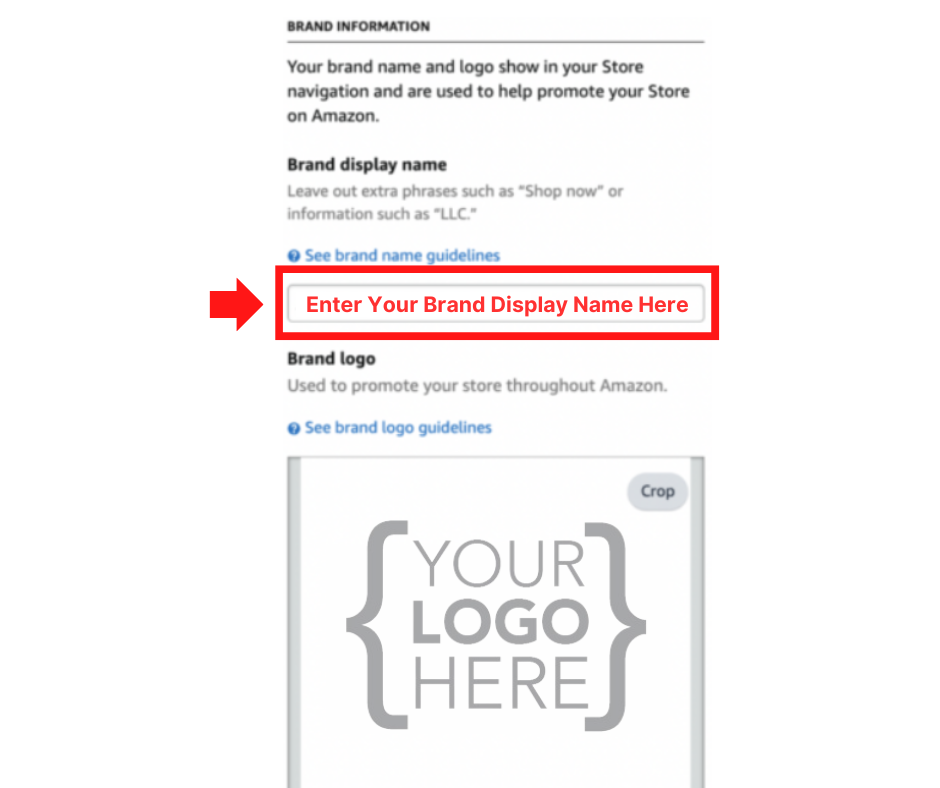
STEP 3: If your brand is already registered, you will then be redirected to the store builder interface, where you will be asked to enter your brand display name and upload your logo, as seen in the image below.
Image Source: Amazon Store – “Create Store,” Screenshot taken Feb. 14, 2024.
STEP 4: Once the initial setup phase has been completed, you will need to select a Storefront layout from three available templates. Each template offers customizable tiles for images, text, video, and other content and for reference, these templates are:
Marquee
The Marquee template showcases curated products alongside ample space for imagery, product descriptions, and customer testimonials. This specific template is “designed to act as a brand or sub-brand gateway page.”
Image Source: Media-Amazon – “Page templates – Marquee,” Screenshot taken Feb. 14, 2024.
Product Grid
This template presents a variety of products with a simple, intuitive, and user-centric design. Its primary purpose is to display a large number of products.
Image Source: Media-Amazon – “Page templates – Product Grid,” Screenshot taken Feb. 14, 2024.
Showcase (Highlight): This template can showcase a diverse range of products with room for product information and visually captivating content.
Image Source: Media-Amazon – “Page templates – Highlight,” Screenshot taken Feb. 14, 2024.
As you progress in building and designing your Amazon Store, you must acquaint yourself with the four key sections of the Stores builder interface. These sections include:
Image Source: Media-Amazon – “Page templates – Highlight,” Screenshot taken Feb. 14, 2024.
Page Manager: This feature enables the creation, selection, movement, and deletion of pages within the Store.
Preview Window: This window provides a real-time preview of the current page, facilitating a seamless editing experience. The Preview Window also allows you to select a tile to edit in the Tile Manager.
Tile Manager: This tool is instrumental in adding, editing, relocating, and removing tiles from your Store, ensuring precise customization.
Status Bar: The Status Bar provides you with insights into the moderation status of your Store and promptly notifies you of any error messages, streamlining the management process.
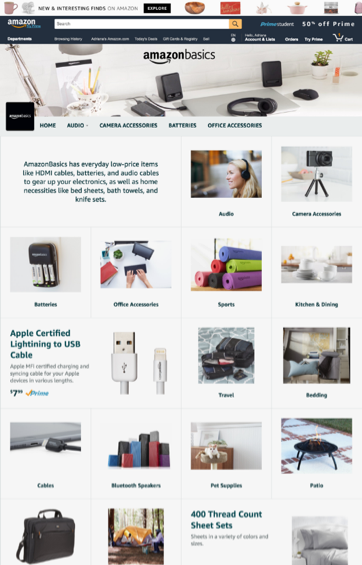
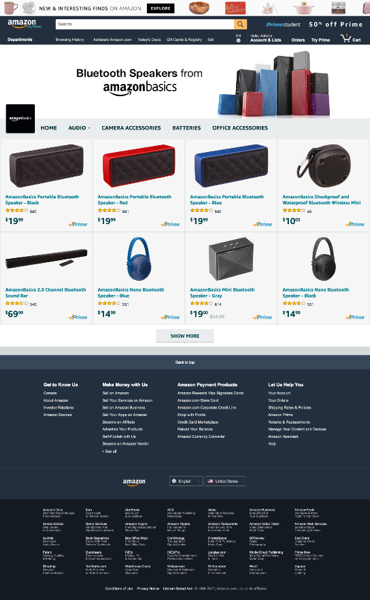
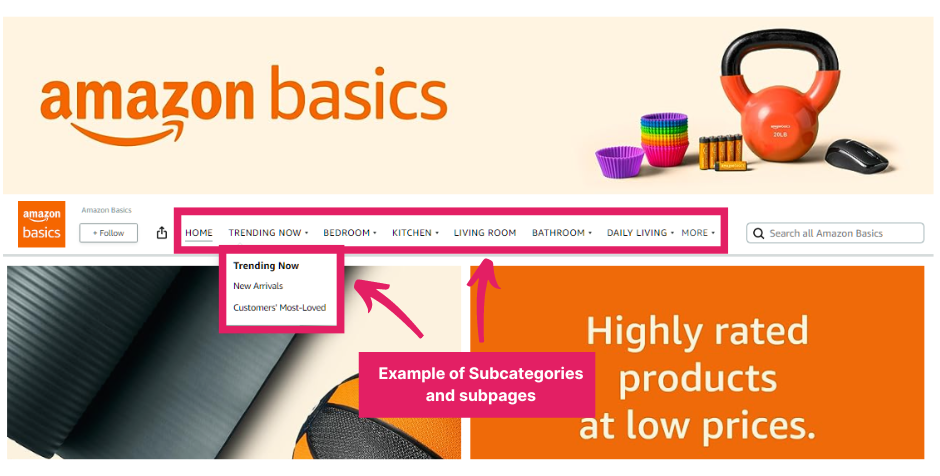
STEP 5: In order to develop your Storefront further, you can utilize the Page Manager tool to incorporate pages, including subcategory pages, to showcase all your products.
Image Source Adapted from: Amazon Basics, Screenshot taken Feb. 14, 2024.
For each page you add, you can enter a unique page name and description, and similar to the homepage of your Storefront, you can also choose templates for sub-pages. To add a page for your Store, you simply:
With the help of the Tile Manager, you can add and arrange each content you plan to add on a specific page. You can combine text, images, or even videos to make the page more engaging for shoppers.
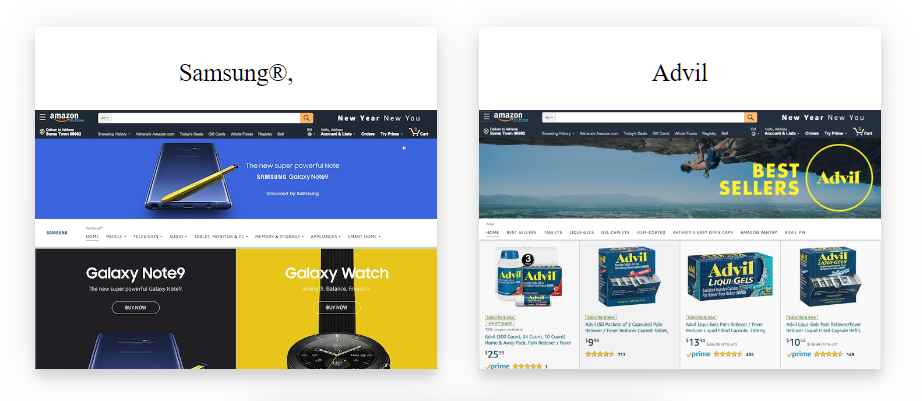
Additionally, you can draw inspiration from other Stores, including your competitors, to gain insights into how they present their products and narrate their brand’s story.
Image Source: Amazon Store – “Featured Stores: Samsung & Advil,” Screenshot taken Feb. 14, 2024.
STEP 6: After building your Amazon Storefront, you must submit it for review. Click “Submit for publishing,” and Amazon will review your Store within 24 hours. After creating your Amazon Store, it would take around 1-2 weeks for it to appear on Amazon.
For a step-by-step guide on how to create your Amazon Storefront, you may refer to the video below:
Creating an Amazon Storefront brings several key advantages to sellers looking to elevate their brand and product visibility. Here are the primary benefits of leveraging a Storefront.
A Storefront offers a dedicated space to funnel online traffic towards a tailored landing page, essentially serving as your brand’s standalone website on Amazon.. Since Storefront essentially acts as your own website, you can employ meticulously engineered Conversion Rate Optimization (CRO) techniques, including but not limited to custom banners, unique graphics, and product highlights. This ensures that potential buyers can easily discover their preferred products.
With the help of Storefront, you also remove the intrusion of competitor ads, such as Sponsored Brands or Products. Visitors to your Storefront are presented exclusively with your brand and products, eliminating distractions and increasing the likelihood of customers making purchases without the interference of external product promotions.
The Amazon Storefront provides sellers with various tools and features to enhance the attractiveness of their brand. It includes showcasing their products in detail through top-notch images, infographics, and engaging videos. Sellers can customize the look and feel of their Storefront to align with their brand identity, thus emphasizing its uniqueness.
To enhance the efficiency of your Amazon Store, it is crucial to familiarize yourself with vital recommendations shared by Amazon and successful sellers who have utilized Storefront. Here are key strategies to consider.
Enable Search Function: Make your Storefront searchable to your followers. Use clear titles, captions, and keywords for easy discovery.
Strategic Use of Affiliate Links: Always link directly from your Storefront to your content on Amazon using affiliate links. Use Amazon’s linking tools for specific product pages.
Promote Your Storefront: Share the link to your Storefront on social media to earn commissions on eligible purchases. Creating a short, memorable URL can enhance accessibility.
Pin Key Content: Pin up to 4 pieces of content to the top of your Storefront. Highlight favorites, personalize your page, or promote seasonal products or deals like Prime Day posts. Pinned content remains prominently displayed, ensuring visibility despite the addition of new content.
Not everyone can create an Amazon Storefront, for Amazon has a strict protocol regarding Storefront creation. To create an Amazon storefront, you must be:
To enroll in the Amazon Brand Registry:
Active Registered Trademark: You will need a brand name with an active registered trademark; it should be registered in the country where you want to enroll.
Trademark Registration Number: Obtain this number from the Intellectual Property office of your country.
No, you can begin as a sole proprietor and later register as a Limited Liability Company (LLC).
Starting an Amazon store is not simply limited to uploading products on the Amazon marketplace. Amazon provides additional avenues for sellers to broaden their reach and enhance customer service. In addition to launching your Amazon store, you can also establish an Amazon Storefront to improve brand visibility and engagement.
To maximize your Amazon business’s potential, consider integrating third-party seller tools endorsed by Amazon. Some of these tools include an Amazon repricer, inventory management tools, and keyword research tools.

Set up in minutes with the help of our customer success team, or reach out to our sales team for any questions. Start your 15-day free trial—no credit card needed!


